I used the Work Sharp Ken Onion extensively. Read on to see why I think you should get one. In a nutshell: it’s reall good at sharpening blades. Get the Work Sharp Ken Onion Edition today. I think you’ll thank me for recommending it.
Disclosure: the post probably contains monetized affiliate links. We earn commission if you buy through them (thanks so much for your support), but you don't pay more for the product.
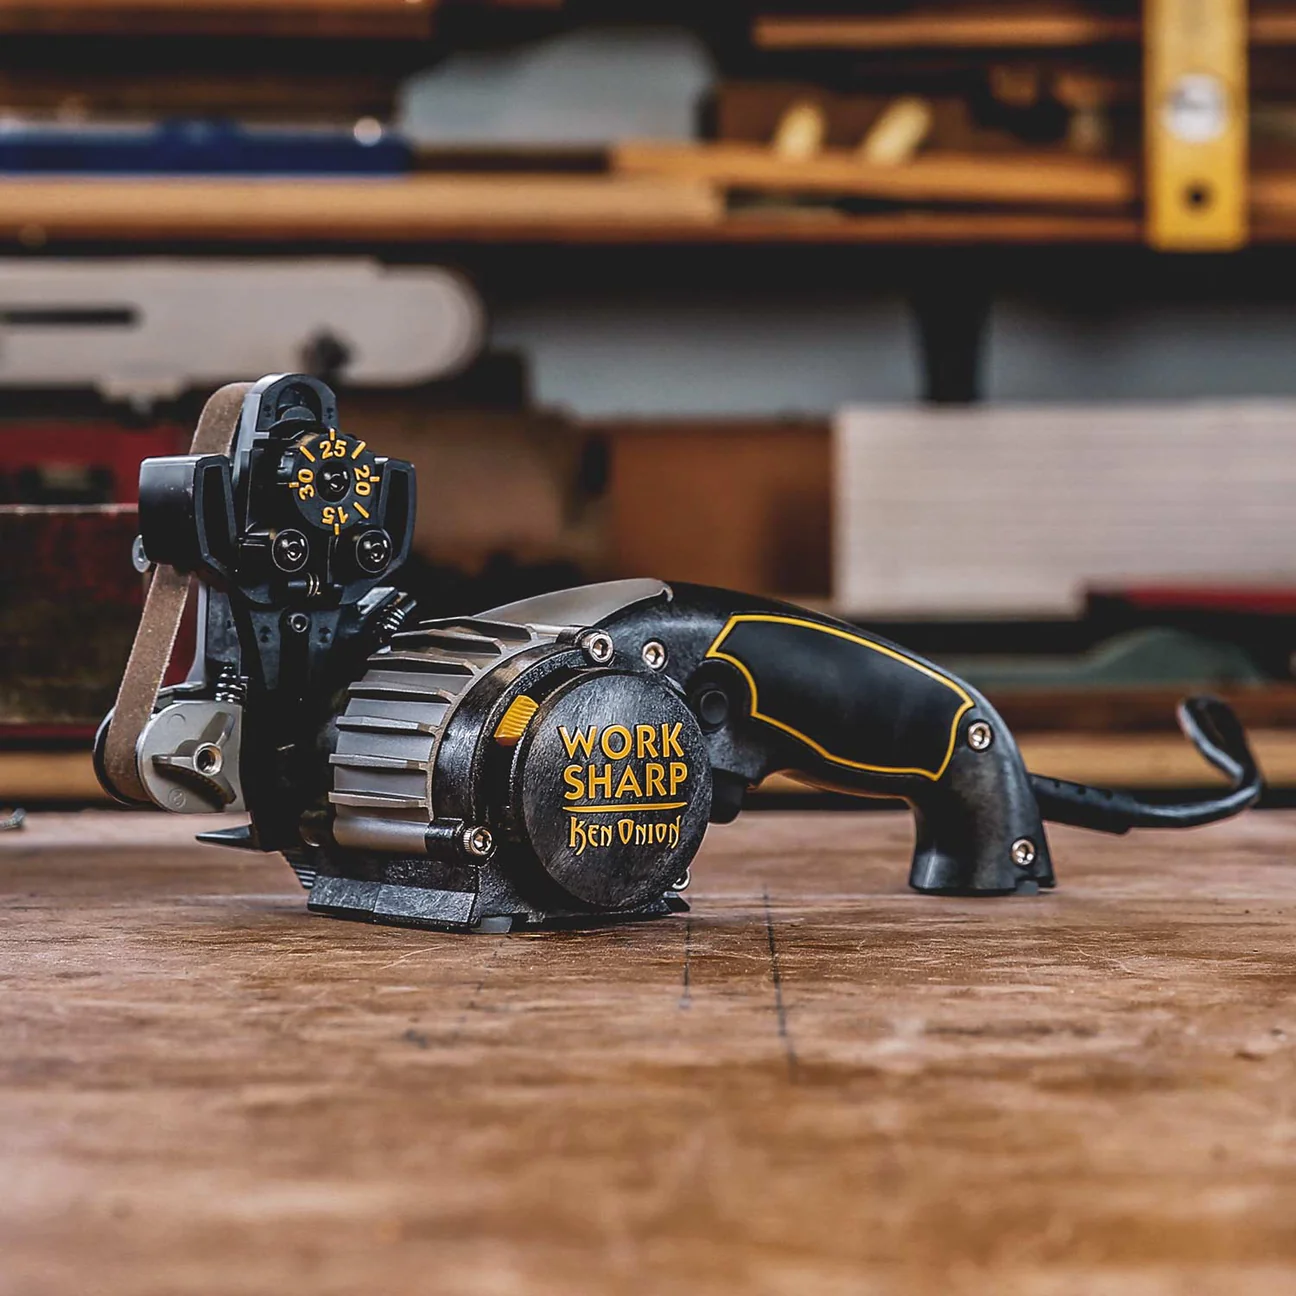
Work Sharp Ken Onion Edition
Model: Ken Onion
SKU: WSKTS-KO
GTIN: 662949041010
I started sharpening blades as a service and got the Work Sharp Ken Onion Edition to help make quick work of smooth edges. But does it live up to its reputation?
TL;DR
I love the Work Sharp Ken Onion Edition.
It’s quick.
Your blade goes from blunt to bling in a few minutes. It’s much faster than the Lansky, Linkyo, and Warthog.
It’s versatile.
Want to sharpen smooth-edged blades? Done. How about an ax? Done. Scissors? Done. Need a different angle on your hunting knife? Done. Need to touch up your machete for those cold Friday the 13th nights? Done. Heck, this thing even sharpens chisels (in an emergency).
It does a great job.
I used to think abrasive belts are a bad idea for sharpening edges. I was wrong. The fact that there’s flex in the belt means the belt conforms to the edge that’s already present, which makes it a forgiving tool. But because the Work Sharp creates a new, convex edge, you’ve got less resistance when cutting and more meat behind the edge, meaning your knife will stay sharper for longer.
Who is It for?

Anyone sick of working with blunt blades.
The housewife who doesn't know that one of the reason's she's exhausted is because she's using knives with blunt blades.
The hobbyist knife maker wanting to sharpen their creation without going on a ten-year sharpening course.
The entrepreneur who realizes there are people in his neighborhood who would pay good money for a sharp knife.
In the Box
The Work Sharp Ken Onion box comes with the following:
1 x Work Sharp Ken Onion knife & tool sharpener.
5 x abrasive belts.
1 x P120 grit for grinding.
1 x X65 (P220) grit for shaping.
1 x X22 (P1000) grit for sharpening.
1 x X4 (P3000) grit for honing.
1 x 6000 grit for scissors and stropping.
1 x user’s guide.
1 x quick start guide.


How to Switch It on
Make sure your Work Sharp is plugged into a wall outlet and the machine is standing sturdy on a stable platform. Then simply press the power switch.
The Power Switch (with Variable Speed Knob) Sits Underneath The Handle. Press This To Get The Machine Going.

How to Adjust the Speed
The Ken Onion Edition comes with a variable speed setting.
The variable speed dial is located in the power switch, making it easy to adjust the speed with two fingers while gripping the machine with one hand.
Left or Right Hand?
The Right Way to Sharpen a Blade


The Work Sharp Ken Onion is built for righthanded people. You sharpen a blade by holding it in your right hand, while operating the machine with your left.
There are exceptions, like when you sharpen a standard serrated knife, which requires you to sharpen only one side. If the serrations are on the “wrong” side however, you’ll use the machine the “wrong” way around.
The Wrong Way to Sharpen a Blade


How to Remove and Attach a Belt
It takes some getting used to, getting the belt on and off, but it’s not difficult. My fat fingers were not used to doing it at first, but soon got the hang of it. The more you do it the better you get.
Removing a Belt
Follow these 3 easy steps to remove a belt:
Place the edge guide in the up position (optional).
Push the spring-loaded belt change lever up.
With the belt change lever in the up position, remove the abrasive belt.
Mounting a Belt
Follow 3 easy steps to mount a belt:
Push the spring-loaded belt change lever up.
Slide the belt onto the two bottom pulleys (one of which is mounted to the belt change lever).
Slide the belt over the top pulley.


How to Sharpen a Knife
Sharpening a knife with the Ken Onion is simple. To show you how it works, I sharpened a smooth-edged steak knife. For the purpose of demonstrating how the machine works, I did not use the machine according to Work Sharp’s directions. The idea is not to sharpen a knife, but to show you how to handle the machine.
Actual sharpening tests follow below.
Rules of Thumb
For sharpening axes and tools, use the coarse belt (P120) at the highest speed.
For honing blades, use the smoothest belt (6000) at the lowest speed.
Rest the blade on the belt before starting the machine.
Turn off the machine before lifting the blade from the belt.
Don’t sharpen the bevel side of a serrated knife.
The recommended feed speed for sharpening a blade is 1in/second (25.4mm/s).
The Right Way to Sharpen a Knife
BEFORE you run the motor, place your knife into the guide slot, onto the edge guide, resting the cheek of your blade against the outer guide.
Start the motor and pull the knife all the way back.
DO NOT apply much pressure. You’re supposed to only keep the knife steady while you guide it through.
BEFORE you remove the knife from the belt, switch off the motor.
Pull the knife through until you’ve raised a burr, then switch to the other side of the blade (if it’s a double-bevel knife).
Remove the knife from the guide slot and repeat the process until the edge is ready.
Once the knife is sharp, use the smoother abrasive belts to hone the blade and alternate sides between each sharpener.
Difference Between Standard Sharpener and Ken Onion Edition
There are major differences between the Work Sharp standard edition and its bigger brother, the Ken Onion Edition. For instance, the Ken Onion gives you more control over sharpening angles, which is important. A general rule of thumb is that the steeper an angle, the longer the edge will hold, but the more difficult it will cut. Some kitchen knives are workhorses, so you’d likely give them a steeper angle. But some knives, like paring knives, would do better with a more acute angle, like 15 to 20 degrees.
Sharpening Angles
The Ken Onion offers more control over sharpening angles.
The standard Knife & Tool Sharpener has only two sharpening angles: 20° & 25°.
The Ken Onion Edition comes with an adjustable sharpening angle range of between 15° to 30°.
Power Button
The standard Knife & Tool Sharpener comes with a 2-way toggle button on & off. The Ken Onion Edition comes with a variable speed button with a trigger lock. The Ken Onion gives you the optimal speed for your application. The trigger lock comes in handy when you want to use the tool at a slightly weird angle to sharpen an ax or if you need to handle the object you’re sharpening with 2 hands.
Motor
The standard Sharpener comes with a 120VAC / 0.14 amp, fixed speed motor. The Ken Onion Edition comes with a 120VAC / 1.5 amp, variable speed motor.
(Work Sharp makes 220V variants too.)
Duty Cycle
The standard Knife & Tool Sharpener has a 20-minute/hour duty cycle. The Ken Onion Edition has a 1-hour continuous cycle. This means you can work your Ken Onion Edition harder than a mule on steroids. Well, not quite, but you can work it harder than the standard machine.
Abrasive Size
The standard Sharpener comes with an abrasive size of ½” x 12”. The Ken Onion Edition comes with an abrasive size of ¾” x 12”. This gives you more belt surface, which probably gives you a little more control and probably makes sharpening quicker too.
What Can It Sharpen?
The Work Sharp Ken Onion Edition is primarily a knife sharpener. It can handle any smooth edge blade, including:
Chef’s knives.
Paring knives.
Steak knives.
Santoku knives.
Utility knives.
Boning knives.
Cleavers.
Swiss Army knives.
Pocket knives.
Also Sharpens
Axes.
Machetes.
Scissors.
Chisels.
It’s not really meant for chisels, but I tested it in any case. Didn’t do too well, but it’s possible.
Sharpening Speeds and Angles
Because the Ken Onion Edition comes with variable speed, you can adjust the machine to an optimal speed for your blade. Here are the sharpening speeds and angles recommended by Work Sharp.
Note that there’s no accurate speedometer on the machine. The terms “low”, “medium” and “high” are all relative. I don’t know what the minimum and maximum speeds for the Ken Onion Edition are. High speed seems to be reserved for sharpening tools with the coarsest belt.
Serrated, Hunting and Pocket Knives
| Edge condition | Desired sharpness | Angle (°) | Speed |
|---|---|---|---|
| N/A | Super sharp | 22.5 | Medium |
| Blunt | Every day carry | 25 | Medium |
| Dull | Every day carry | 25 | Low / medium |
| Neglected | Hunting sharp | 25 | Low / medium |
| Dull | Hunting sharp | 25 | Low / medium |
Kitchen and Filet Knives
| Edge condition | Desired sharpness | Angle (°) | Speed |
|---|---|---|---|
| N/A | Super sharp | 22.5 | Medium |
| Blunt | Every day carry | 25 | Medium |
| Dull | Every day carry | 25 | Low / medium |
| Neglected | Hunting sharp | 25 | Low / medium |
| Dull | Hunting sharp | 25 | Low / medium |
Axes
To sharpen an ax with the Work Sharp you must remove the sharpening guide. That means getting the right angle on your axe’s edge is up to how well you can judge with the naked eye, since there’s nothing to guide the ax with. It shouldn’t be a problem though, since an axe is not a precision tool.
Sharpening Tests
In total, I sharpened a length of more than 111,41 inches of edge (9.28 feet, or 2.83m). The actual distance, however, is more, since some of the blades I sharpened required sharpening on both sides.
I ran the following edges through the Work Sharp:
6 smooth-edged knives (7 edges in total, because the Victorinox has two blades).
6 serrated knives.
Note: you can’t sharpen the serrations themselves like you can with a Lansky (using the round sharpening stone). The Work Sharp only allows you to sharpen the smooth side.
2 machetes.
3 small scissors.
1 ax.
3 chisels.


Pocket Knife
I started off with a friend’s abused Victorinox Swiss Army knife he uses as his EDC. The Victorinox’s blades are too small to use the Work Sharp’s guide slots on, so I just sharpened without them. The beauty of the Work Sharp sharpener is that it’s not rigid. It conforms to the shape already available on the blade, which is great, because you don’t have to reset the shape every time you sharpen, unlike with the Lansky. The difference was astounding, and even though I could have sharpened the Victorinox’s blades even further, my friend was content with the level of sharpness I produced.
I started with the X65 (P220) abrasive, pulling the blades through 5 times per side.
Then I used the X22 (P1000) and pulled them through 3 times per side.
I moved on to the X4 (P3000) and pulled them through 3 times per side, alternating with each pull.
I finished the blades by pulling them through the 6000 5 times per side.

Chef’s Knife
I got this monster chef’s knife for the test. The owner of this knife uses it for cutting meat, so I used the Work Sharp quick start guide to get this baby into shape.
Sharpening angle: 20°.
Sharpening speed: low.
Belt/s used:
P120. 2 passes per side.
X65 (P220). 8 passes per side.
X22 (P1000). 4 passes per side.
X4 (P3000). 4 passes per side.
6000. 4 passes per side.


Serrated Knife
When you sharpen a serrated knife, don’t sharpen the beveled edge. Only sharpen the flat side of the blade. It’s the same principle you apply when you sharpen a pair of scissors.
Sharpening angle: 0°.
The blade is placed flat against the belt.
Sharpening speed: low.
Belt/s used: 6000.
6 passes.
Scissors
I started with the 6000, but soon realized I’d need to use a coarser belt. So I switched to the X22. The scissors worked much better post-sharpening.
Use only the 6000 belt (meant for stropping) to sharpen scissors.
Start with the X22 (P1000) belt if your scissors are really dull.
Don’t sharpen the flat side of the scissors, only the beveled side.
Gut Hook
Unfortunately, I don’t have a gut hook, nor could I find one for the test, but here are the basics of sharpening a gut hook.
Use only the 6000 belt (meant for stropping).
Remove the sharpening guide before you start.
Use a 2 to 4-second cycle per side.
Axe Head
I’ve previously sharpened an axe head with a Lansky sharpener, which gave it a keen edge. Sharpening the axe head with the Ken Onion worked exceedingly well. You’ll notice in the video that I held the ax in my hand. Although not necessary, it would be better to secure it in a vice.
Sharpening angle: N/A.
For sharpening axes, you remove the sharpening guide.
Sharpening speed:
high for initial sharpening.
low for honing.
Belt/s used…
P120.
6000.
Machete
I bought a secondhand machete for my green woodworking endeavors. the edge was in terrible condition, but the Ken Onion did a fine job of sharpening it. I also sharpened a machete for a friend of mine.
A machete should actually be sharpened the same way you’d do an ax. In other words, you’d remove the sharpening guide and rotate the sharpening cassette. However, I wanted to see if I could sharpen these monstrosities the same way I’d sharpen a knife.
But… I had to remove the sharpening guide for the machetes to fit the machine. So I eyed the machete’s angle while sharpening it.
The honing I simply did to remove any burrs, but it’s not necessary.
Sharpening angle: 25°.
Sharpening speed:
high for initial sharpening.
low for honing.
Belt/s used:
P120.
6000.
Chisels
Work Sharp makes a tool called the Wood Tool Sharpener specifically for sharpening things like chisels, but I wanted to see if I could get a decent edge on some old chisels with the Ken Onion. It’s not a good idea to sharpen chisels with a width exceeding ¾”. I used putty adhesive to secure the machine to the table while I had it running with the power switch lockout activated. I only used the coarse belt (P120).
It works, but it doesn’t do a good job. The belt is too flexible, so it’s hard to get a straight edge. The Ken Onion Edition isn’t made for chisels.
Circular Knife Blade
A friend asked if it would be possible to sharpen a circular knife blade (AKA pizza cutter wheel) to which I replied, “let’s see…”
It worked really well. The Work Sharp is perfect for sharpening circular blades, as long as you have a steady hand.
Sharpening angle: N/A
I removed the sharpening guide.
Sharpening speed: low
Belt/s used:
P1000.
How to Remove the Guide
For some sharpening operations, like sharpening a serrated blade, you must remove the sharpening guide. Here’s a video showing you how to do it.
Warranty
The Work Sharp Ken Onion Edition comes with a 1-year warranty.
Replacement Belts
You’ll find plenty of suppliers on Amazon selling abrasive belts made for the Ken Onion Edition.
Of course, Work Sharp creates an official range of Ken Onion Edition abrasive belts, also available through Amazon.
Take note, though, that the Ken Onion Edition’s belts don’t fit other Work Sharp products.
Addons
There are a number of items you can upgrade your Ken Onion Edition with.
You can also buy the sharpening cassette and edge guide separately.
Blade Grinding Attachment
You get a blade grinding attachment for the Ken Onion Edition.
This expands the sharpening angle range of the Ken Onion from 15 to 30, to 10 to 35.
The belts for the blade grinding attachment are double the width of the standard Ken Onion belts. You need fewer passes to sharpen your blade.
Tool Grinding Attachment
Unfortunately, the Ken Onion tool grinding attachment has been discontinued.
It’s still available through Amazon though, so perhaps jump while you can get it. Although, you probably don’t need it. So forget about it.